Unity UI
In this section we will go over an example of making a UI on unity and uploading and coding it on Client3D in graalscript.
Asset Bundles can be found here : https://www.graalonline.com/playerworlds/downloads/file?name=MenuUI.unitypackage
Unity Part:
Open the “Quattro3D- Unity Project for bundle asset creation” folder using unity hub.
To the assets folder, add we add a folder that will hold all the prefabs of the assetbundle.
To the scene, add a Canvas (in the Hierarchy, right click -> UI -> Canvas). The Canvas will hold all the elements of our UI (buttons, text, scrollbar, images…).
Select the Canvas and in the Inspector go to Canvas Scaler and select Scale With Screen for UI Scale Mode. This will allow the canvas Canvas to expand to full screen on all screens.
Now to build the UI you see above (devtools). Start by adding Text elements (right click on Canvas -> UI -> Text).
For each element, change the name and the text according to its function, change the color to white, add a button component and add a animation component. In the Rect Transform component, in the Anchor Presets, hold Alt and select top left to position your element.
Add all the Text elements and position them (Inspector, Bundle Explorer, Console, Camera, Rendering).
Now, to add the back button. Add an Image element to the UI, change its name to “back”, and in the image component add the source of the image (drop down in our case). Rotate it -90 deg on the Z axis for it to face left. Add a button component to turn it to a back button that closes the devtools.
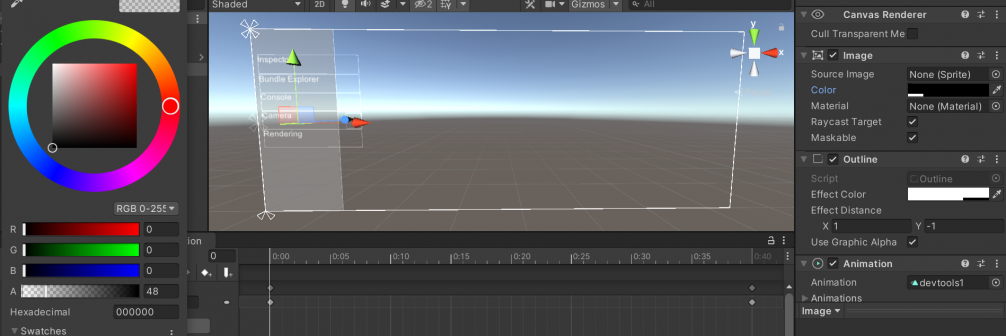
For the grey background you see, add and image just like before, change its color to black and change the A field in RGBA to 48 to make it transparent. Add an Outline component and change the Effect Color to white to add an outline to the image.
Now that we’ve added all our elements to the Canvas, it’s time to create our animations.
To create an animation, in the top menu (next to Files, Edit, Assets…) go to Window -> Animation -> Animation.
The animation tab should open in the bottom. Select the component you want to create an animation for and create and name the animation.
We will be doing the sliding background image example for the animation.
To record the animation, press on the record button. We want the image to slide in. So put the cursor on time 0s, and change the Pos X to -65 (outside of the screen) then move the cursor to 4s and change the Pos X back to 65. Press the record button again to save the recording.
You can press play to view your animation in action. To add the animation to the element; simply add an animation component and add the source of the animation you just created.
Same thing goes for all the other animations.
Graal Script Part:
Now that we’ve created our prefabs and added the animations, our canvas is ready to be uploaded on the server and scripted. Save the AssetBundle and upload it to the server (Uploading and Loading AssetBundles for more info).
 findplayer("Graal5918039").addweapon(this.name);

//#CLIENTSIDE

function onPlayerChats() {
  if (player.chat == "dev") toggle();
}

public function toggle() {
  (@"3D/Dev/AssetManager").loadAssetBundle("devtoolsui");
}

function onAssetBundleDownloaded(bundlename) {
  if (bundlename == "devtoolsui") {
    this.keepAlive = true;
    this.btns = {"inscpector", "bundleexpl", "console", "camera", "rendering", "back"};
    this.devuiprefab = GameObject::fromassetbundle("devtoolsui", "assets/menuui/canvasdevtools.prefab");
    this.devui = Object::Instantiate(Type::GameObject, this.devuiprefab);

    for (btnb: this.btns) {
      temp.btn = Quattro::TransformExtensions::FindDeepChild(this.devui.transform, btn);
      Quattro::EventManager::AddEventHandlerTo(temp.btn.gameobject.GetComponent(Type::UI::Button));
      this.catcheventobject(temp.btn.gameobject, "onClick", "onDevToolClick");
    }

    Object::Destroy(this.devui, 4);
  }
}

public function onDevToolClick(go) {
  if (go.name == "inscpector") player.chat = go.name;
  if (go.name == "bundleexpl") player.chat = go.name;
  if (go.name == "console") player.chat = go.name;
  if (go.name == "camera") player.chat = go.name;
  if (go.name == "rendering") player.chat = go.name;

  if (go.name == "back") close();
}

public function close() {
  for (btn: this.btns) {
    temp.btn = Quattro::TransformExtensions::FindDeepChild(this.devui.transform, btn);
    Object::Destroy(temp.btn.gameobject);
  }

  temp.img = Quattro::TransformExtensions::FindDeepChild(this.devui.transform, "Image");
  temp.anim = temp.img.gameobject.GetComponent(Type::Animation);
  temp.anim.play("devtools2");
}
We load the assetbundle the usual way:
(@"3D/Dev/AssetManager").loadAssetBundle("devtoolsui");
function onAssetBundleDownloaded(bundlename) {
  if (bundlename == "devtoolsui") {
this.keepAlive = true; is necessary for the weapon to keep checking for button clicks.
We create and instantiate the canvas prefab.
this.devuiprefab = GameObject::fromassetbundle("devtoolsui", "assets/menuui/canvasdevtools.prefab");
this.devui = Object::Instantiate(Type::GameObject, this.devuiprefab);
this will display the canvas on the client screen.
To detect button clicks;
temp.btn = Quattro::TransformExtensions::FindDeepChild(this.devui.transform, btn);
Quattro::EventManager::AddEventHandlerTo(temp.btn.gameobject.GetComponent(Type::UI::Button));
this.catcheventobject(temp.btn.gameobject, "onClick", "onDevToolClick");
we first find the button GameObject by name (this.devui.transform being the transform component of the canvas, and btn is the button name we want to find).
Next, we add an EventManager to the button component of the GameObject we just found (temp.btn.gameobject.GetComponent(Type::UI::Button)).
And this.catcheventobject(temp.btn.gameobject, "onClick", "onDevToolClick") to catch all the onClick events.
Finally, we implement public function onDevToolClick(go) to add functionalities after button is pressed (with go the GameObject being pressed).
For animations, to add or play an animation, you will need to get the animation component of the GameObject first. (using: temp.img.gameobject.GetComponent(Type::Animation))
temp.img = Quattro::TransformExtensions::FindDeepChild(this.devui.transform, "Image");
temp.anim = temp.img.gameobject.GetComponent(Type::Animation);
temp.anim.play("devtools2");
(more script functionalities for animations available here: https://docs.unity3d.com/ScriptReference/Animation.html).


