Creation/Dev/Gani/Tutorial
This is a Wiki Adaptation of the Gani Tutorial by Fulg0reSama it can be found in it's original form here.
You can also download it in DOC and PDF formats.
Observing the program
Okay, if you observe the program carefully this is going to look to be a very minimal and older style looking program to that of a GIF animations program or like Macromedia Flash if you have used those kinds of program before. If you have, then the idea of animation itself should be pretty simple for you because you are not going to be creating the sprites themselves most likely yourself unless you are a graphic’s artist, Graalshop is only intended to be used for the “bringing to life” of the sprites that you place in yourself. I will explain more in the third section but for now, read carefully and learn!
Terminology used and what they mean
Sprite: a Sprite is an image cut from a spritesheet that you will use for creating your animations, without these ganis wouldn’t be visible!
Spritesheet: Spritesheets are an entire image file full of pictures of actions or movements to create the illusion of movement, which is all animation is on its own; the illusion of frames of pictures with delay to portray the idea of movement together to create a “moving picture”.
Gani: a Gani I would recommend reading it as G.ani or the full name being Graal Animation, people have referred to these as Gani for several years so it’s good to know the term and even a very few people call the people of these animations “Gani Artists” or even “Graal Animators”(this is very unlikely for chances are they may not even know what you do.)
Param: Short for Parameter, which is essentially the setting of a visible variable in your gani. This is mainly utilized through scripting; another development, which goes great in hand with ganis with proper understanding, fortunately you will not learn scripting from me. This can allow images with the same exact spritesheet templates to all be useable for the same gani, Great for mass producing weapons or other various things in pairs and groups for your development work, like Zodiac does with all of their weapons.
Template: The outlines and dimensions of your spritesheet. Which are necessary to keep the same for use of spritesheets in your params of ganis.
Movie Mode: This is the second half of ganis, which are much less touched as far as ganiing goes and I will also strictly advise anyone to NOT PARTAKE IN THIS FORM OF GANIS AT ALL! I will not teach this gani type because they are only for cinematic use in Graal, which is rather useless when its interface is utterly confusing and too much effort for the reward of whatever you created; which will only going to cause you and everyone else around you a clear amount of trouble, But if you’re hell bent on these kinds of ganis in any way there is already a movie gani FAQ up on the Graal Forums.
Import: Import means to transport in something from an outside source; an example would be importing your sprites from your spritesheets or sprite definitions from another gani (like a palette for a painter.)
Explaining the Interface and Its features
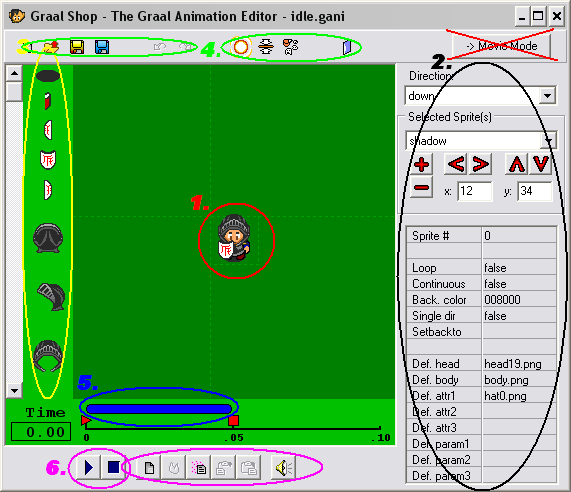
I’m going to guide you through every nook and cranny in this program, I ask you pay close attention to the red, blue, yellow or black circles and even green circles in each picture I present to you in this tutorial. They will be used for pairing off parts of the interface. Look below to look for your first picture.
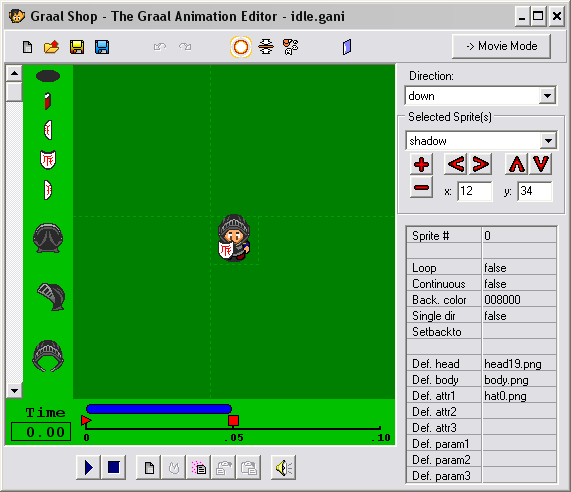
When and after you downloaded Graalshop and open it up; above is what you should see. Now I bet you’ve got some concerns about this since this doesn’t look very informative on by itself; so look below for a picture once more.
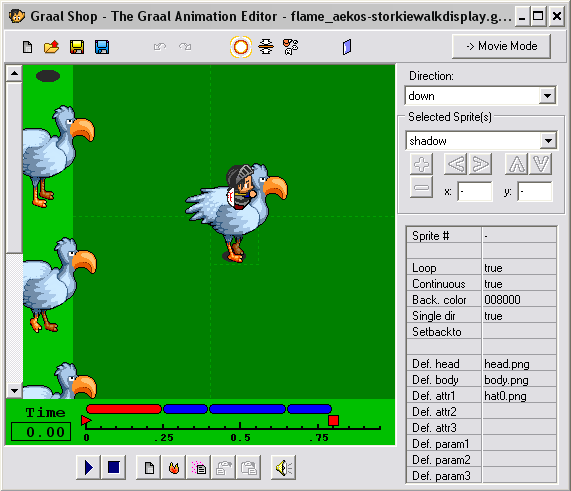
1. 1st thing I bet that’s what you noticed; that is the character standing in the middle of a strange dotted line square, Now that is where a character is going to appear if you compared this to in game; because the square represents the player’s space and should be used to centralize your character so he doesn’t appear to be twenty pixels to the left or right. If you click away from a sprite you will drag that with your sprite(s), so be careful for it’s also not very necessary to move the gani box around at all.
2. The 2nd thing I have marked is the gani configuration panel; this is where you set your ganis script params, model’s appearance if want to you wish to change that (make the character look all pretty if you like, I prefer the default), change the background of the gani section, choose to loop the gani or not and or whether if it lasts forever or not;
You may also change the sprite of one sprite into another through changing it’s sprite ID which is what makes each sprite a unique piece, set images to player attributes which is what I like to think as “Accessory” section is where you can add an image into the field for sprites, though it’s best to leave these actually blank, unless you have a server where you need more than default parts in your default ganis (You suddenly make a server where players are capable of having customizable earrings, bracelets n stuff! Liek Omg!) Otherwise leave them blank.
You can also do params as well but just like attributes these are left blank for usual gani work; the only difference between params and attributes are that one stays when you log off and one does not (attributes stay forever until cleared, params leave as soon as they’re done) but just leave the scripters to play with those ;), you can also use the setbackto option to connect ganis to one another, this is particularly useful to make things like for example throwing a punch return to your idle or possibly a fighting stance gani (zodiac does this with their punch, then they return to a idle where they’re ready to throw another jab).
I guess the only part I’m forgetting to mention which is the most important of all is where you can set the direction for where the player will be facing when this part of the gani plays, this is simply so if you turn left your gani will play the action you created for left (this could be anything, you could have ganied a mask where every time you turn based on where you turned, your mask changes its appearance)
You are also capable of selecting your sprites from a pull-down menu of names of the sprites you have placed (I’ll go into that as soon as possible) and have them selected, for more precision incase you don’t trust your shaky hand motion…
You can always use the up down left right buttons or like me use the up down left right arrow keys to move the sprites pixel by pixel to get the best precision, if you actually have an idea of how many pixels you need to move a sprite and know your x y coordinates then simply add or subtract those pixels into the x or y coordinate fields desired. You’re even able to change the sprite’s display by moving it to the back of one sprite or to the front of another sprite to make pieces look proper towards what you’re created (Example the player’s helmet if you brought the helmet out before the head.) with the + and – sign buttons.
3. The third area I have circled is the sprite selection, there isn’t very much to be told of this section except for two vital things, look way below to see what I mean. I forgot to add that I am also going to make things go along a lot faster by mixing the third circled areas with the fourth considering they are two halves of a whole in use.
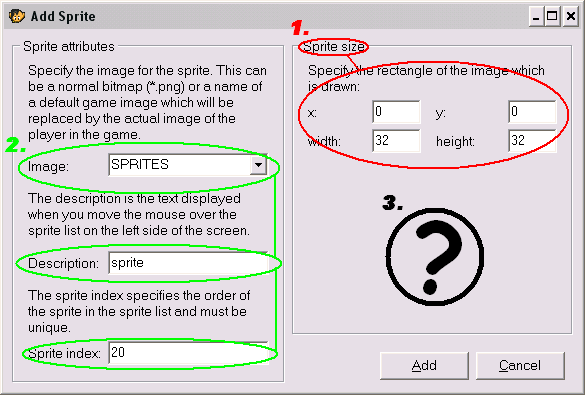
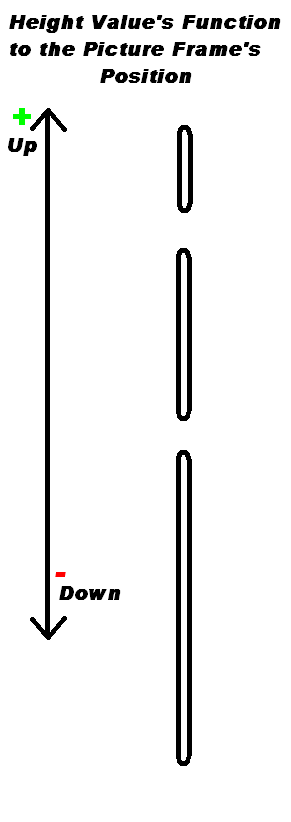
The first thing in this picture I want you to pay attention to is the Sprite Size section, This is where a lot of people who just begin ganis go “WTF HOW DOES THIS WORK?” and so we prevent that confusion; I’m going to show you how to use it. Now imagine width and height operating together like a picture frame. When using width you will stretch the size of the frame from the left to the right, here’s a visual example of what I mean.
Now to show you what happens with the height value being modified below instead of width.
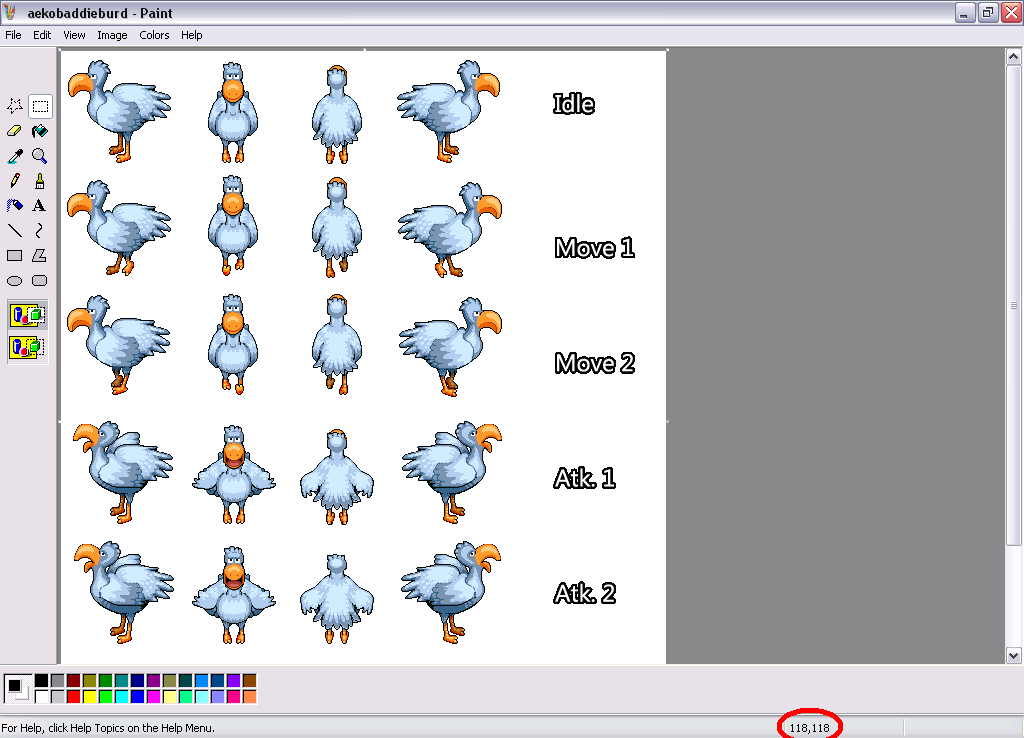
Now what these pictures are for is basically showing what you “draw” for the dimensions of the sprites that you are about to create from your spritesheet. This is valuable to know but to make this information even useable you need to know the next step towards shaping your sprite; which is setting the location of where your sprite’s “cookie-cutter” rectangle is to be, which I will display the use of with a very nice spritesheet created by our very own Aeko (Clockwork) of a eloquent looking bird (resembling of an adorable creature from a video game you may or may not know).
Which is also to be a creature on the server “Maloria”. Now why did I bring in this birdie? Well keep your ass down in your chair, couch, bed or beanbag chair you sit on and I’ll show ya!
“I thought there was going to be free birdseed!”
3.1.2 Okay, I have here a picture of the birdie in Graalshop as you can see above. This is the sprite I’ve cut myself and I’m going to show exactly what I did so you can do this easily without having to worry about tedious amounts of time wasted in doing so. Now look below again for another picture (There’s going to be quite a few more of these) of what I did in the sprite menu for that.
I’m going to quickly but surely explain the point of X and Y coordinate placements and the second and third things I circled in the picture way back of the sprite menu. You see this is where you direct where you wish to place the width and height dimensions to be cut from the sprite sheet to make a nice sprite. Shown below how it’d handle this particular sprite.
I bet you’ve been wondering for a small while back there with last picture about “Why is that section covered with a (?) Sign?” Well you see that is the sprite grid section of the sprite menu. I myself never would use that feature, just leave it as it is whenever you create a sprite and this slightly humorous picture will show and explain why.
![]()
“WHAT THE … !@#* !”
“Edited with care, too bad about that bird’s ass n tail feathers though. Yes they did all speak one sentence in part.”
What will happen when you use sprite grid feature, you will make a bunch of x and y cuts like you can manually; but the only problem with this feature is that most if not every single graphics artist you will gani for is not going to make a sprite sheet where they make it grid-able like gridding requires. The reason a graphics artist wouldn’t be caught dead making their work to accommodate this feature has two reasons behind this, firstly because they usually have no clue about how ganis work which is a slight shame and secondly is because sprite sheets are usually very broad fields that the graphics artist see as their playground and will usually make it so it’s easy to understand towards their perspective, I mean they try their best towards accommodating to others perspectives but it never works out usually, So it is generally best to try to assume that they didn’t think about it and do it by hand anyways. Now all of that aside let’s go back to the sprite menu one more time shall we?
Damn it, I wish the riddler would leave my images alone! ! !
I believe the only thing I have left in this section is to go over the use of the “Sprite Index” once more If I haven’t already. Now what is this that you ask? This is what I like to call the “Sprite Book” and like a book, this is what holds all of the content and when you’re in the sprite menu you can change the “page” or number in this case to the “next page” or up by one number (or down your choice) and create a new sprite which will make sprite creation definitely quicker and possible with proper editing of the x, y, width and height values (Careful for changing a sprite index number that if you change the index number of one sprite to that of another it will overwrite the sprite you used the same number of the sprite that held the index number before you changed it.) if you know what you’re doing.
4. You’ve made it very far in this manual tutorial, the only thing I have left to teach you about is how to use the frame bar and what’s below it. I’ve established more on the bird since you last saw him and created a simple display of the bird with a rider on its back walking in the right direction, which is attached in this tutorial’s zip if you wish to see it in more fluent action. (I have also decided to call him Storkie btw and if you try to use this gani or one that doesn’t belong to you anywhere for applying you will most likely be declined for theft.)
“Wee! Giddy up birdie!”
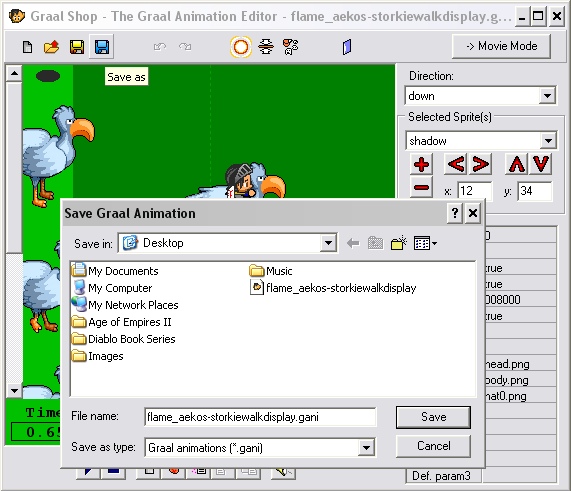
The frame bar will come in two different forms, highlighted and un-highlighted. This is where a gani can be made or broken here, also where a lot of the time will go in ganis after assembling them. When ganiing I find it best to press the button that appears to have purple glitter behind a page going lower right. Afterwards of copying the frame you are on; you can then proceed to use either one of the clipboard buttons that will place your copied frame before or after the frame you currently have the play sign staying at. Remember when you create your frames that the frames are for all directions you create for the gani. You can also add sounds into your ganis very simply with the megaphone button for sounds, you simply press it and a megaphone will appear; afterwards you just type the name of the sound file you wish to use (Graal has many in its folders and you can put in your own) and of course you have your simple play and stop buttons. I do believe that’s about all there is to using ganis on the basics of how to use it. I hope this has helped you vastly with learning how to do ganis. The only thing left to do after going through such a long process is to save the gani! Whenever you save a gani simply press the blue disc button for “Save As”, find where you want to save (For some reason the program will default in the ganis folder; don’t save it there. I suggest your desktop) and save it just as I show below.
The blizzard novels of the Diablo universe are a good read!
Questions and Answers
Okay before I close this all up, I’m going to answer some questions and give some answers to those questions that a lot of people who’ve attempted ganis usually have some form of trouble towards and even help with what situations I know of.
Question 1: Okay I just hit the button that looks like a blue door with some white on it… and now my gani is in reverse! What do I do?
Answer: Okay, you simply clicked Reverse Animation, simply click it again and everything will be fine.
Question 2: I just installed GraalShop and everything is running slow; why is it doing this?
Answer: Okay, this happens on very computer computers it seems, I only know that if this happens chances are it’s the color settings you have on your graphics card; the only way I know to fix this is to set yourself from 32 or 64 bit to 16 bit for GraalShop to function properly, on my computer it does this as well and it still doesn’t play the actual gani inside the program very smoothly or fast, just go to the Testbed Server, ask for Remote Control or RC from someone who will give you assistance and test your ganis on there.
Question 3: Some people have told me that those light effects on a lot of servers are actually just ganis; can you explain what they’re talking about?
Answer: Yeah, those “light effects” are actually called Particles; Particles are the more complex form of ganis. Particles are simply the act of using scripts that run emitters that manipulate images with their colors and alphas with values and usually a good dose of math in the gani file which is done by opening the gani through notepad and the format is usually something this in the file just after where the gani is ran in the file.
SCRIPT
//#CLIENTSIDE
function onPlayerEnters() {
  // Code Here
}
SCRIPTEND
Now of course that example wouldn’t work (I don’t do particles for a reason folks), If you wish to learn particles I attached an effects help guide by Daisuke Tornova (aka darkcloud667 and good friend of mine) that can help you learn how to do so, I highly suggest learning the basics of scripting itself before attempting so.
Question 4: Oh ****; I just overwrited one of my default ganis! What can I do about this?!?
Answer: This is a pretty irritating happen on rare occasion that I wish didn’t happen often but if you have this problem then I suggest deleting the gani, delete the FILENAMECACHE.txt file (do the first two steps offline), login and connect to any classic server to receive the ganis for someone is bound to be walking normally I hope) around the area.
Question 5: Okay, I seem to understand everything; but isn’t there an easier way to get the dimensions of the sprite so it’ll cut clean?
Answer: Yeah there is, I don’t do it really since I’ve more or less grown used to doing sprites without the need but when you have a bit of a problem here’s how you can do it.
See those numbers? That’s the position of where my mouse was on the image according to the sprite’s pixel positions. Remember X and Y is where it’ll decide to draw the sprite from, but doing this will allow you to get the actual dimensions of what X and Y will draw. If the image seems a little bit too small in the document, I attached every single image used in this tutorial to allow you to get a better view.
Question 6(For GFX who are ganiing): Yeah, I’m trying to get my sprites to load from the image, but it won’t appear… Why?
Answer: Well, there are a few situations for this.
First off, make sure you have the image inside the graal folder, doesn’t have to be in images or anything just in the graal folder where the client for Graalshop and the rest hang about and personally I put the image on the desktop as well for backup and just to be sure it loads purposes.
Second off, chances are you may have an image that is using Truecolors; Truecolors are any color that is not in the 16 bit or 256 color palette (Red, Green and Blue). Unfortunately the color support for graal will not display this in the gani, nor will they physically appear in the gani just as if it never existed. I have only found that the way to going around this is simply making a cut out edition of the sprite being used, positioning it where you want and all that jazz like you were creating the gani, save it and then go into the gani file through Notepad and edit the image used for each sprite with the image originally used. You won’t be able to edit it without that cut out image really but graal will display it in the client.
For any more questions that you need to have answered, you can forum pm me (Fulg0reSama) on GraalOnline Forums for an answer or ask fellow developers of the Graal community to learn more.
Credits
This is where I’m giving credit to those who deserve and have earned it from me by either contributing to my knowing or my tutorial in general. You guys rock and I hope everyone who read this tutorial got as much as kick as I did writing this. Now here we go!
HIM Without this dude, I wouldn’t know how to gani at all!
IL’ Palazzo Somewhat drove me in my early times to improve.
Chang Good ganiist who gave me the chance of using RC to get to do my ganis and much more! (Even If he was an asshole.)
Kay If she didn’t hire me as an ET I wouldn’t have learned so much in development in general and I thank her very much for that.
Kez I wouldn’t have learned basic scripting (my first script string to learn was replaceani (“newgani”,”oldgani/NULL”);) and wouldn’t have kept my interest towards ganis.
Zheak This guy was and I think still Is a badass developer, I wouldn’t have been able to make so many awesome ideas without being a duo with this dude, created a lot of pretty cool stuff with him and I won’t forget that anytime soon.
Sandz This dude back in about 2008 to 2009 is a dude who definitely taught me a thing or two with ganis back on Delteria, I would probably be a lot worse as a ganiist today If I didn’t go to Delteria so you guys definitely deserve a shout out!
And finally…
GraalOnline Community (aka Many people from Graal Forums) I wouldn’t have learned from many of you guys without observing other scripts, other ganis etc and have developed my own sense of how I see graal, you guys are the best.
